I've always been a windows user, UNTIL about a year and a half ago my son introduced me to the world of MAC. I love my MAC. There was a bit of a learning curve, won't deny it. And I must say I'm still learning. The hardest thing for me was not having that photo editing software to work with. I'm a creature of habit, once I find something that works for me, I don't change it. Ever. Well toss that out the window. Being on this Mac I had to change my editing software. No choice.
So I sat down one day and went thru the video's at UTube until I found some on using iPhoto. Wow. If you get someone who really knows their stuff you can conquer about anything. So let me show you how I learned to work with my images in iPhoto!
First thing you have to do is figure out where you have the images you want to work on and then where you want them to go when you are done with them. Once you have that you've got it made. Now comes the fun part. So here we go! The captions UNDER each photo will explain the process for that screen.... READY?
Above - The screen that starts it all. Ignore the "Recent". Look at the pull down window. See where it says, IMPORT TO LIBRARY? Yeah that one. Click on it. When you do it opens .....
Once your download is complete you will see your photo's displayed as you see above. Up in the right corner it will even tell you how many photo's you have in that download. Next you need to choose the image that you want to edit. You need to choose the photo that you need to edit. When you click on the photo, it will put a yellow "frame" around it.
After you see the yellow frame, look down into the bottom right hand corner of your iPhoto screen. You want to find the image you see above. Pretty straight forward eh? You want to click on EDIT.
Once you click on EDIT, the the window above will appear. Not rocket science at all. It does exactly what it says it will do. The primary ones I use are straighten and crop. It should offer a bit of comfort knowing that you can always UNDO or REVERT TO ORIGINAL.
As you can see in my image above the headstone photo is a bit off kilter. So I've chosen "straighten". The Slider bar and grid on the screen make it easy to straighten about any image you have need to. Not complicated, simple and functional. Just what the technology challenged need!
Once you have finished straightening you click on Crop and the window you see on the right opens. It gives you all sorts of choices. You can start at the top of the list and work your way down. As you choose you can see right on your screen what it will be like on your image. How can you miss it when its showing you as you do it? When you get it done the way you like, you simply click DONE. That's it. You edited your photo and had no strokes or heart attacks. No you are ready to move the images you've edited into a folder. Once again you'll have to decide where to put the photo's.
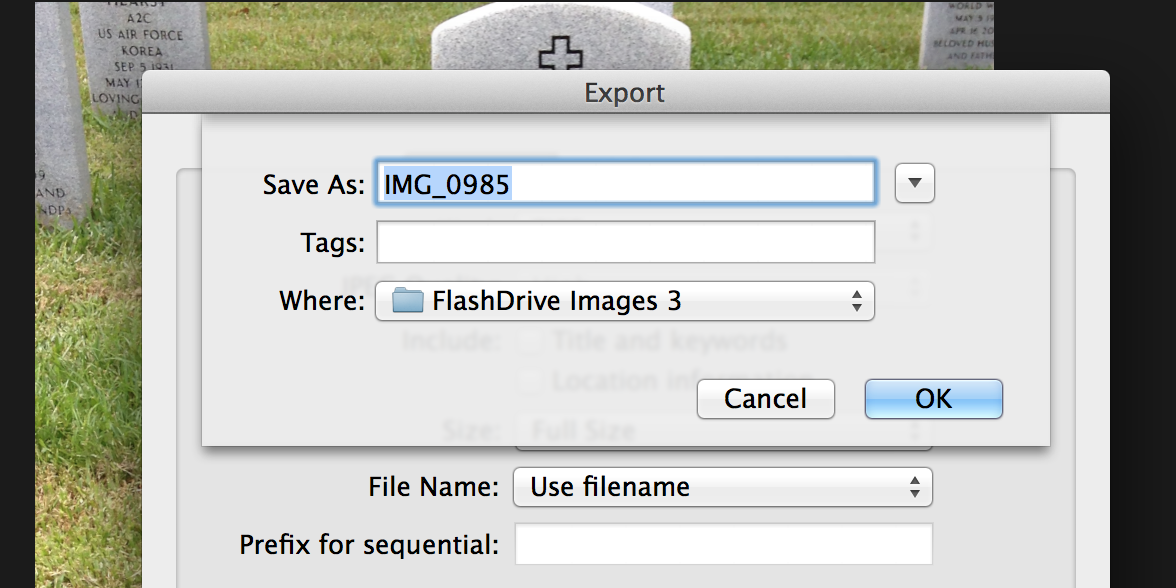
Next step is back to the window again. File>EXPORT.... yep you are going to send the images to a new home. No stress, No worry! Its really quite simple. Click on Export and you'll get another window....
When you get this window you've really been busy. So you choose the kind of picture - I chose TIFF, but Jpg and others are in there as well. I always mark HIGH QUALITY, and I include Title & Keywords and Location information. I also tell it to USE FILENAME......
Finally It will say SAVE AS.... and you name the image you want to send and where it is going. Be careful here, because once you fill these in and click OK.... the images will be moved INSTANTLY.
SEE, I told you it wasn't that big a deal. And once you do it a couple of times it makes things so easy! Hope this helps. I'm not the biggest techie in the world but when I find something and it works I like to share it. I know that not everyone likes or uses iPhoto, but if you've thought about it, now might be a good time to give it a try!
Happy Researching!
Karen


No comments:
Post a Comment